
Monday, November 4, 2013
Sunday, October 6, 2013
PATINA CLINIC
Each semester we hold a patina clinic at the National Casting Center Foundry for the seniors as well as regular patina demos: here are some of the results:


Senior Danny Van Winkle applies ferric nitrate to aluminum to give the affect that the diving helmet is made of heavy iron. One the ferric is washed off he is then applying some cupric nitrate to provide the sense of algi and history. It looks like it has been under the sea for eons!


Each one of Caleb Fletcher's eye collection has a different patina combination: blacks, blues, browns, reds and yellows are applied so each one is unique. The color was chosen to reflect the eye color of loved ones.


 Make sure you are set up under a vent hood or in a well ventilated area.
For this heat patina: Senior Casey Duer applies several coats, starting with liver of sulphide, then ferric nitrate, both with a spray bottle. Then on top of that he carefully applies cupric nitrate with a brush to create a dappling affect.
Applying a patina to work can add context, color, enhance texture and meaning. It can add character and history, it can make an object appear more precious, ornate and delicate.
A patina is the exterior
color of metal. It is the result of a chemical reaction with the metal
that literally changes the surface color and it can be either natural,
man-made or both.

Luke Voytas is applying a cold patina of diluted flat black rustoleum enamel to his aluminum casting that provides depth and brings out the texture. This can be buffed back to highlight high and lows.


Senior Danny Van Winkle applies ferric nitrate to aluminum to give the affect that the diving helmet is made of heavy iron. One the ferric is washed off he is then applying some cupric nitrate to provide the sense of algi and history. It looks like it has been under the sea for eons!

Each one of Caleb Fletcher's eye collection has a different patina combination: blacks, blues, browns, reds and yellows are applied so each one is unique. The color was chosen to reflect the eye color of loved ones.

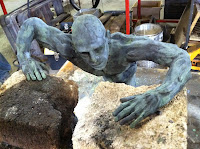
Cast Iron : first sandblasted and a light coat of ferric nitrate is sprayed on and washed off with water to give one overall even color. Life Body Cast by Senior Caleb Fletcher

Senior Sarah May spend several hours buffing and polishing the Cast Iron to achieve this beautiful mirror effect. Start with a coarse grit and sanding and polishing in a circular motion up to a 500 grit, eventually using a buffing pad and buffing polish.


A Patina can make all the difference once the sculpture is in its natural setting: here the aluminum casting takes on the natural colors in the landscape : one of mud, wood, leaves but resiliently standing up against the wear of life. Installation in the creek by Senior Caleb Fletcher.

 |
The Bronze casting is cleaned and sandblasted before the patina process. This way the chemical can react just to the metal. It is important that there is no grease or other chemicals on the surface before you start.
 Make sure you are set up under a vent hood or in a well ventilated area.

For this heat patina: Senior Casey Duer applies several coats, starting with liver of sulphide, then ferric nitrate, both with a spray bottle. Then on top of that he carefully applies cupric nitrate with a brush to create a dappling affect.
 |
| Peter Leone, brass centrifugal casting |
 |
| Hannah Crowl : 'Acuputure' Cast Iron and copper pins |
Applying a patina to work can add context, color, enhance texture and meaning. It can add character and history, it can make an object appear more precious, ornate and delicate.
A great example of a natural patina can be seen on
the Statue of Liberty. The beautiful green color is the result of
decades of air and moisture reacting with the copper. A natural patina
usually develops over a man-made patina that was applied by the artist
during the casting process.
Patinas are traditionally applied
with brushes or a spray bottle where the sculpture is heated to 200f
heat, but patinas can be applied in various ways : such as boiling,
burying, painting, plating, and wrapping the sculpture with chemical,
paint or other substances that will affect and change its color. . Once
the desired color is achieved the sculpture is rinsed with cold water to
stop the chemical reaction. Once the desired color is achieved two
coats of wax or laquer are applied to the sculpture while it is still
warm to seal the patina.
Different chemicals react with different metals
to achieve different colors. One of the most common patinas on broonze is Liver of
Sulfur (potash) which results in a golden-brown to almost black color.
Other chemicals include Ferric Nitrate (golds, browns and reds) and
Cupric Nitrate (greens and blues). They can also be used in layers to
achieve a variety of artistic effects.
Follow this link : Silver Nitrate Patina Where you will see a
complex patina application using high temperature red enamel engine
paint, silver nitrate and soot. For further research and tutorials
visit the Sculpt Nouveau You Tube Channel.
Saturday, October 5, 2013
Working Hard
Students of the National Casting Center Foundry making
repairs to the cupolette “Mothra” which will be used at the iron casting workshop during the 2013
International Sculpture Symposium in Miami Florida.


Saturday, September 21, 2013
MEET OUR FOUNDRY TECH LUKE VOYTAS !

Monday, September 16, 2013
Alzheimer's Glass and Iron from Alfred University to Salem Art Works
In late August, 2013 painting sessions with elderly suffering from Alzheimer’s and Dementia were held in Washington County, NY and Bennington, Vermont. Jacqueline Dillon, Elise Betrus and Rosemarie Oakman facilitated the events working wit...h the individuals and using iron oxide pigments to create unique and expressive paintings. These paintings were then distributed to several artists at Salem Art Works who will be casting a sculpture in response or homage. The sculptures will be created during the upcoming year in support of the Alzheimer's Iron project. The iron oxide paintings and iron sculptures will be partnered and shown together before the sculptures are auctioned off in Fall 2014. Proceeds once again will be going to the Alzheimer’s Association. The project will be returning to Salem Art Works next summer 2014 for an extended stay.
There are many ways to be involved with the Alzheimer's Glass and Iron project. If you are interested in painting with the elderly of Washington County, casting an Iron sculpture or would like to explore other ways to participate in the Salem Art Works Summer 2014 sessions, please e-mail Alzheimersiron@gmail.com
Save the date! You won't want to miss the Intercollegiate Iron Pour at Salem Art Works September 27th-29th. Join us as molds for the Alzheimer's Iron Project are poured! Come enjoy the great food, molten metal, amazing people, fire & fun!
Pictured: Yellow Skies at the Bennington Monument
Painting by Doris, Bennington VT.
Mold by Elise Betrus Alfred NYSee More

Tuesday, May 7, 2013
Sogata


Sogata is a Japanese process of creating cast metal vessels commonly used in tea ceremonies, but is also a hands on and renewable process of mold making that is attractive to the modern day metal caster. See the link below for a step by step process of how to do your own sogata!
Sogata Step by Step
Environmental Foundry Gallery Show
 |
| Renée Vogelle, Godless Shrine, Bronze |
 |
| Stephen Rooney, Structure, Bronze |
 |
| Stephen Rooney, Horns, Bronze |
 |
| Becca Flis, Homage to Mother Nature, Bronze |

 |
| Renée Vogelle, Sogata Vessel, Bronze |

Check out the Environmental Foundry Show details!
Dung Molds
This dung and clay mold process has it's origins rooted in ancient Africa. Below are some pictures of the process and final products of using this process! At the very bottom of the page is link to a step by step visual guide to using this method of mold making.


A Step by Step to the Dung and Clay Method of Mold Making
Saturday, March 9, 2013
The Artifact: Environmental Foundry Processes
The Artifact
My idea of what an artifact is comes from the Oxford English Dictionary definition of "artifact" which is described as "an object made or modified by human workmanship, as opposed to one formed by natural processes" or "an excavated object that shows characteristic signs of human workmanship or use." For the purposes of the assignment I chose to define an artifact as anything with human influence. If a human has made it, altered it, picked it up and used it for a specific purpose, it’s an artifact in line with my personal definition of the word.
For the artifact assignment I chose to focus on using the hand in order to produce forms that allude to function. I am interested in the idea of excavating an object and not knowing exactly was it was used for, but finding clues of it’s function by looking at its different aspects. If 1,000 years from now my artifacts were found, what kind of function could they imply? How can I make something that looks like it might be used for a certain purpose, but also have ambiguity to any such purpose? In addition to this, I am also interested in the process of making and how I can reference that process in the final form. By using the hand(s) as a basis for my artifacts I’m leaving an imprint of the wax process of making in the final metal cast. The dung and clay method of molding is very supportive of the reference to the hand, since it is such an involved process. The steps of sifting the dung, mixing the different layers of the mold and then layering them onto my wax pattern is so integral to my interest in the hand and how the hand is involved in the making process.
I enjoy the dung and clay mold process. It’s relaxing and it’s a lot different in doing a shell or sand mold. There is a variable of time that you have to account for. Different molds take a different drying time and you have to know by feel when you should add the next layer and whether it’s to wet or too dry. I’ve been having a lot of cracking happening during the final drying out of the mold and I think this is because I’ve been going to fast in adding the next layer to my molds. Since some of my molds cracked, I’ve also had a lot of flash in and I even had a mold bust open and let all of the molten bronze out of it before it could cool. This was upsetting, but I may have been pushing the limits of the dung mold process because this mold was almost as large as a football, albeit a hollow form.
The Research
I did research on some different types of artifacts and I was most interested in Native American and Viking tools and ceremonial objects. I thought that these provided the most interesting forms that didn't necessarily connect completely to their main function. I sketched my favorite forms here:


The Process
To make the wax version of the artifact I used warm wax, that was the consistency of silly putty, and molded the wax around different parts of my hands/arms. For my largest mold, I pressed the wax around my hand to create a sort of pouring container. For the smaller molds I used the tip of my fingers to create a recess into the wax form. After the pieces were sprued, vented and attached to a cup, the layers of dung and clay mixture were added.
 |
| The imprint of my hand was on the interior of the form. The wax was pressed onto the top and sides of my hand. |
 |
| The wax that was molded over my hand. This is the outside of the form. |
Once the dung molds were finished being layered, they were left to dry out until the melt out kiln. The melt out charcoal kiln was also a very cool process. I never imagined that this kiln could be set up so easily. You could do this whole process in your backyard if you wanted to. I was very surprised that there was so much smoke from the kiln. I’m unsure if this was due to the moisture still left in the molds, the burning of the charcoal or the melting wax catching on fire. Or maybe it was a combination of all three of these. After the molds are cast and cooled for a few hours they can be carefully broken open. The pieces of used mold can be crushed and recycled by sieving it through the different sized sieves.
 |
| The charcoal wax melt out kiln. Larger molds are placed in the back to maximize efficiency. |
 |
| These small forms were the wax forms molded around my fingertips. They cast extremely well. No vents were needed because the clay/dung molds are fairly porous after the dung is burned away in the melt out process. |
 |
| This was the form that was molded around my hand. It was the largest mold I tried to do. It broke open before the molten bronze could completely cool, so it only cast half-way. |
In the remainder of the semester, when the weather gets a little better, I would like to try making a kiln out of the dung/clay paste and see if this perhaps might keep more heat in. I am excited to see what I can make next. I would like to try making small intricate pieces, perhaps jewelry items, using swirls and twists of wax like the ancient Africans did using beeswax to make bronze jewelry.
 |
| An example of an intricate ancient African pendent. I would like to attempt some of these forms in the near future. |
Ancient African method of bronze casting: http://www.metmuseum.org/toah/hd/wax/hd_wax.htm
The Vessel
The ancient Japanese method of sogata clay molding is very difficult for me. I didn’t really know what I was doing half of the time and I wasn’t sure if I was doing something wrong and if I was I had no idea how to fix it. But finally I got the first half of the piece mold finished. What I’ve learned is that you need the clay to be the right consistency when working with it because if it’s too wet it will all just gather at the bottom of your mold and if it’s too dry it won’t stick to your previous layer. But the water content in the mold mixture also depends on which layer you are working on. For the coarser material wetter might be better so it will stick to the previous layer, but it’s difficult to defy gravity with wetter clay. So if you need to cut back in with your mold you need to do that layer in parts so the clay that’s cutting back in has a chance to dry so it won’t collapse due to gravity. Also with a form that cuts back in on itself it’s very difficult to fit your hand into the flask to put on the layers of clay. You really just end up always hitting part of the clay you’ve already smoothed over. I’ve definitely learned to make patterns that do not cut back in on themselves because it was so frustrating doing that type of pattern for the first time doing a sogata mold.
 |
| The finished first half of the sogata mold. |
 |
| The workstation set up of the sogata molding process. |
Patination
I haven’t had much of a chance to patina metal in past projects, but I am excited to experiment with different color patinas. I would like to produce/find a patina that makes bronze look aged (say for 1,000 years) and I would also like to look for patinas that are brightly colored. For patination I am most interested in finding “natural” patinas that do not necessarily involve super toxic chemicals that I may not be able to get my hands on in the future when I’m on my own. The other reason I’m interested in natural patinas is because I don’t necessarily like to work with toxic chemicals and since the sogata and the dung and clay molding processes are natural processes without any toxic chemicals I think it would be good to use natural patinas.
Subscribe to:
Posts (Atom)